Guide to Dry Brining Meat
Guide to Dry Brining Meat
I used to think you had to leave meat submerged in a bath of salt and herbs and spices (wet brining) for days. There's a much easier, cheaper way to add moisture, flavour and tenderness.
Ready in: 3 hours
Serves:
Complexity: very-easy
kcal:
Share

Ingredients
What is dry brining?
What types of meat should you dry brine?
Step by step instructions for dry brining chicken
Dry Brining FAQ’s
Directions
WHAT IS DRY BRINING?
Dry brining may sound like a fancy cooking technique, but it’s actually incredibly simple.
The dry brining process involves rubbing the exterior of raw meat with salt and letting it sit in the refrigerator before cooking. This has has two positive effects:
1/ Since salt is a flavour enhancer, letting it work it’s way into the meat brings out all the delicious flavor in your meat.
Salt has an effect on the proteins in the meat – this is called denaturing and essentially means that the proteins unwind a little. The outcome is that the proteins can hold onto moisture, keeping your meat juicy throughout the cooking process.
Dry brining achieves a similar outcome as wet brining, but because you don’t dilute the salt in liquid you need a lot less salt and a lot less space in the fridge. There’s also a lot of evidence out there that suggests wet brining is not an effective way to get more flavour into your food.
Dry brining is a great way to ensure moist meat with a little extra flavour without the extra mess and wasted ingredients you get with wet brining.
Benefits of Dry Brining
Applying salt to meat several hours before cooking has several advantages:
Dry brining is an effective way of adding flavor and locking moisture into your meat.
Dry brining takes up much less space than wet brining does. You simply need enough room in your fridge to sit the meat for a few hours, as opposed to the room needed to house a large tub filled with the meat and the brine.
As we mentioned, compared to wet brining, you need less salt to dry brine, as it is not diluted in liquid.
Unlike wet brining, you will also not lose any of the fats and juices from the meat when you dry brine, and there is no chance of your meat becoming soggy, which can happen when wet brining.
Related – Salt & How To Use It
What Types Of Meat Should You Dry Brine?
You can dry brine almost any type of meat. Turkey, chicken, fish, pork, lamb and beef will all benefit from the salty treatment. Some might tell you that red meats should not be brined. But we think this is a subjective issue – why don’t you give it a go and judge for yourself.
One word of caution however, dry brining is no good if the meat you have purchased is already salted. This would be a case of too much of a good thing. Be aware that kosher meats are salted as part of their preparation.
Step By Step Instructions For Dry Brining Chicken Or Turkey:
While just about any meat will benefit from dry brining, chicken and turkey are great candidates as they tend to become dry when cooked. Roasting a chicken in particular is a great way to practice using this technique, as it is not as expensive as some other meats.
Let’s break down the process of dry brining a chicken or a turkey:
1) Pat the Bird Dry. Use a few paper towels to pat the chicken or turkey dry, making sure to get in all the crevices. You may have been told you should wash chicken before preparing it, to make it safe by removing harmful bacteria. This is actually a myth. Cooking meat at the correct temperature is the only way to eradicate harmful bacteria. In fact, washing raw meat increases the risk of cross contamination, as the bacteria from the surface of the meat can be splashed over kitchen benches and utensils.
If you would like to know more about which foods should be rinsed and which ones should not, you can find more information from the USDA here.
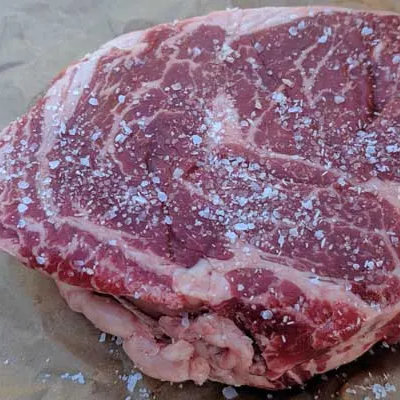
2) Salt the Bird. Sprinkle the bird with salt. And don’t be shy with the amount you use. You would have to go pretty crazy to oversalt. As a general rule, about 1 teaspoon of salt per kg of meat is a good guideline. You might want to use a little more, but if you use less you will not get the full benefits of dry brining the bird. Work the salt into the skin. Make sure that the entire surface is covered well, and don’t forget to check in all the nooks and crannies to ensure you have an even coverage – this is perhaps the trickiest part of dry brining. You can use any type of salt, but many find that medium grit, kosher or sea salt are the best to use. The granules of table salt can be too fine and may leave your bird too salty.
3) Pop it in the Fridge. Leave the salted bird in the fridge for 2-24 hours. While some may prefer to put the bird in a large size zip lock bag, there may be benefits to leaving it uncovered in the fridge. This will help dry out the skin and lock the moisture inside where you want it. This may seem the opposite to wet brining, as the whole idea of wet brining is to add moisture. But if you want your meat to have a crispy skin whilst being moist and tender inside, allowing the skin to dry out and sealing in all the natural juices is the best way to accomplish it.
4) Cook the Bird. Now you are ready to use any method cook the bird. Dry brined turkey and chicken are especially good in the smoker.
As a result of locking in that moisture, you are sure to have moist, juicy meat and that prized crispy, tasty skin. If you want to add additional flavour in the form of a spice rub or sauce, add it just before cooking.
Make sure you check the ingredients of the rub or sauce you plan to use. If it is also salty, you could end up with an unpleasant, overly salty outcome.
Dry Brining FAQ’s
Doesn’t dry brining make your meat too salty?
If you use the recommended amount of salt, it won’t. Of course, what is salty to one person is not salty enough to another, so you might need to experiment a little bit to get the amount just right for your taste.
Beware when using a rub after dry brining. Some commercial dry rubs are salty in themselves, so you might need to dust off some excess salt or make your own salt free rub to avoid this problem.
What kind of salt should I use?
Kosher salt or sea salt are preferred by most cooks, as it is easier to control the level of saltiness, due to the size and structure of the grains. Table salt is finer than kosher salt, so if you have no choice but to use table salt, knock back the amount you use. You will find it will be “saltier” than kosher salt thanks to its density.
How much salt should I use?
As a general rule, about 1 teaspoon per kg of meat will yield good results. Some cooks recommend more than this, while others recommend less. Your own preferences will come into play when determining your own “sweet spot”.
One thing is for sure, dry brining and then adding a salty rub will result in a very salty bird, so check the ingredients of your rub, or get creative and make a salt free rub yourself!
How long should you dry brine for (and can you dry brine for too long)?
At the very least, give the bird 1 hour to dry brine to get any benefits.
For chickens, you can leave it sitting in the fridge up to 24 hours, and Turkeys can be left for 2-3 days.
Bear in mind that you can overdo it. Brining for too long will start to dry out the fat underneath the skin, leading to dry meat which is exactly what we are trying to avoid.
Do you need to rinse after dry brining?
Definitely not!
If you are tempted to rinse because you fear oversalting it’s more effective to control the rub you put on before cooking.
If you discover your rub is salty, you can simply dust off some of the excess dry brining salt without the mess involved with wetting the entire bird. If you are not using a rub, or your rub is salt free and you have used the recommended amount of salt, do not fear – your bird will not be too salty!
Second, your skin will not end up brown and crispy if you wet the bird. Sure, you could pat it down with paper towels, but you will lose a lot of the benefit you gained from the salt if you do this.
As we have mentioned – rinsing meat also increases the risk of foodborne illness, as raw meat juices and the bacteria in it will inevitably be splashed around your kitchen in the process.
Wrapping Up.
Dry brining is so easy, so your next roast chicken stands to gain loads in flavour and juiciness by giving it a try.
Next time you plan to cook a turkey or a chicken, give yourself a few minutes to salt the bird, then stick it in the fridge for at least 1 hour before you cook it – you will be pleasantly surprised at how much of a payoff you will receive for so little work!
Just remember to check the salt content of any rubs you may want to add, or make your own.
TIPS FOR DRY BRINING
The salt crystals should be larger than table salt. We suggest kosher or sea salt.
We recommend ½ teaspoon of salt for every 1 pound of meat. Try to use no more than 1 tablespoon per side.
Dry brine about an hour per inch of steak. Thicker cuts require more time so that the salt can work its way deep into the tissues.
The steaks must be well rinsed and well dried after being salted. Don’t add additional salt after the steaks are rinsed and dried. Just a little freshly ground pepper will suffice.
Remember, always rest the meat for a few minutes before cutting so the juices remain inside your steak instead of on your plate.