
Shiso Gyoza
Shiso Gyoza
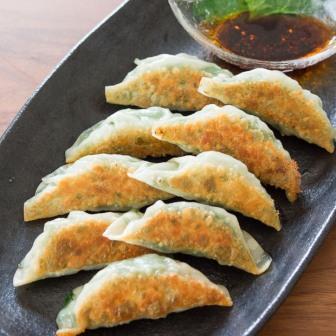
These pork and garlic chive gyoza are wrapped with green shiso for a delicious twist on the classic.
Ready in: 40 minutes
Serves: 8
Complexity: medium
kcal: 221
Share
Ingredients
FILLING:--
200 g cabbage
200 g pork, ground
30 g spring onions minced
30 g garlic chives, minced
15 g ginger, grated
1 tbsp potato starch
1 tbsp toasted sesame oil
1 tsp SIDS CRAZY SALT
1 tbsp soy sauce
1 tbsp saké
1 tsp SIDS SALT & PEPPER
GYOZA:--
40 gyoza or wonton wrappers
40 shiso leaves, green
Rice bran oil
SAUCE:--
2 tbsp soy sauce
2 tbsp rice vinegar
Chilli oil (optional)
Directions
Put the cabbage in a pot and add enough water to cover it. Cover the pot with a lid and boil until it is starting to wilt. (about 2-3 minutes). Drain in a colander while you prepare the other ingredients
In a bowl, add the ground pork, spring onions, garlic chives, ginger, SIDS CRAZY SALT, potato starch, sesame oil, soy sauce, saké and SIDS SALT & PEPPER.
When the cabbage has cooled enough to handle, shake off any excess water that has collected between the leaves, but do not squeeze the leaves (the water content of the cabbage is the secret to juicy gyoza!). Remove the core and discard. Chop the cabbage into 5 mm pieces and add it in with the pork.
Put some gloves on and knead the pork and cabbage together until it forms a relatively uniform paste.
Prepare a bowl of water to wet your fingers with and a tray lined with oven paper to hold your wrapped gyoza.
Place a shiso leaf in the middle of the wrapper. If your leaves are too large, you may need to trim them down so they fit in the centre of your wrapper without going all the way to the edges. Place a tablespoon of meat mixture in the middle of the leaf. Wet the fingers of your right hand and moisten the entire rim of the wrapper like you would an envelope. You need to get enough water onto the rim to make the wrapper stick, but not so much that you make it mushy. Fold the wrapper over and then use your thumb and forefinger to pleat the edge from the left to the right. As you pleat, use your left thumb to press the completed pleats down to seal the dumpling. When you're done, put the dumpling in the palm of your hand and make sure it stands up with the pleats facing up. If it's not stable, tweak the shape a little so that it's able to stand with the pleats facing up. Place the dumpling on the prepared tray and repeat until you are out of filling.
To fry the dumplings, prepare a small bowl with 3 tablespoons of water. Heat 2 tablespoons of oil in a heavy bottomed 25-30 cm non-stick pan over medium/high heat until hot. Line up the dumplings in rows and let them fry until the bottoms take on just a hint of colour. The pan should fit 10-12 dumplings at a time. Hold a lid with the side closest to you touching the pan like an open clam shell. (the opening should be facing away from you) Reach around and quickly pour in the 3 tablespoons of water and shut the lid as fast as possible. As you might imagine, pouring water on to hot oil will result in a lot of spattering. Be careful and quick to avoid making a mess. Let the dumplings steam until there is no water left in the pan. (this should take about 2 minutes) Because of variations in pots and their lids it's possible you might run out of water more quickly. If this happens, add a bit more water and continue steaming. When the water is gone, remove the lid and fry the gyoza until they are golden brown on the bottom.
Serve the gyoza browned side up so they don't get soggy. Dipping Sauce: mix equal parts soy sauce and rice vinegar and add some chilli oil to taste.
These gyoza can be frozen on the oven paper lined trays. Once they're frozen you can put them in a Tupperware or freezer bag. When you cook them, the process is the same, but you will need to use more water and let them steam longer (about 5-6 minutes) to make sure they're cooked through.